登录界面模板_html写登录界面登录
今天我们做一下设置页面和登录页面的布局登录界面模板,因为这个系统如果不登录的话,几乎是没有任何权限可以操作的。
再说明一点:现在的APP普遍要求做到一打开后不需要任何操作就能看到界面和基本页面,哪怕页面是空的,用户在操作时再弹出提示要登录才能继续。说这样的要求是为了用户体验;
就比如银行APP这样要求安全的软件,也是在打开后不需要登录就可以看到一些东西,等具体操作时,才会要求登录。
如果不这样做,你把APP设计成一打开就要求登录,多半是在应用市场和小程序后台审核不过去的。

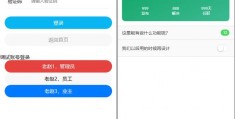
登录和设计页面大概样式
上面就是“登录”和“设置”页面的大概布局,以后有需要我们会随时改动。为了测试方便,我在登录下面做了三个为了调试而设置的快速登录按钮,按一下就会以相应身份登录。
这两个页面的代码如下(我尽量把注释写全):
登录页面:
<template> <view><!--每个uniapp的vue文件都要至少有一个view--> <view class="input-box"><!--标签的class属性控制着它的样子,在下面的style里定义的--> <view class="input-item"> <view class="input-label">手机号</view> <view class="input-body"> <input v-model="phone" maxlength="11" type="text" placeholder="请输入手机号" class="input"> <button :disabled="!isCanSendCode" class="btn-code">{{sendMsg}}</button> <!--uniapp中标签属性前面带:号时,后面引号里代表是VUE的变量名--> <!--如果不是标签里想引用VUE变量,要用{{变量名}}来引用--> </view> </view> <view class="input-item"> <view class="input-label">验证码</view> <view class="input-body"> <input v-model="vCode" type="text" style="margin-right: 50upx;" placeholder="请输入验证码" maxlength="20" class="input" /> <!--上面这个v-model是双向绑定,变量改变时这里的值变,这里的值变时,变时内容也会变--> </view> </view> </view><!--如果只有一两个标签的样式需要改变,而我又懒,就直接在标签里用style来指定样式,不需要在下面去定义--> <button class="button" style="background-color: #08B6F2;color: #fff;">登录</button> <button class="button" type="default" style="margin-top:30rpx;color:#999;">返回首页</button> <view style="margin-top:50rpx;"> 调试账号登录 <button class="button" type="warn">老赵1,管理员</button> <button class="button" type="default">老赵2,员工</button> <button class="button" type="primary">老赵3,业主</button> </view> </view></template><script> export default { data() { return { /*VUE的变量们,这里的变量可以和上面模板里绑定,然后会互动*/ sendMsg: "发送验证码", isCanSendCode: true, phone: "", vCode: "" } }, methods: { /*VUE事件函数放这里,因为我们还没做逻辑,所以这里是空的。*/ } }</script><style lang="scss"> /*页面样式类的存放地方*/ button::after { border: none; } .input-box { padding: 50upx; font-size: 30upx; .input-item { display: flex; background: white; border-bottom: 1upx solid #eeeeee; line-height: 100upx; height: 100upx; .input-label { width: 150upx; } .input-body { position: relative; height: 100upx; width: calc(100% - 150upx); .input { line-height: 100upx; height: 100upx; position: relative; font-size: 28upx; width: 300rpx; } .eye { position: absolute; height: 50upx; width: 50upx; right: 0; top: 50%; transform: translateY(-50%); } .btn-code { position: absolute; right: 0upx; top: 50%; transform: translateY(-50%); background: none; color: #205592; width: 160upx; font-size: 24upx; box-sizing: border-box; text-align: right; padding: 0; height: 100upx; line-height: 100upx; } } } .select { padding-top: 40upx; display: flex; justify-content: space-between; color: #003B67; } } .button { margin: 0 30upx; border-radius: 50upx; line-height: 80upx; height: 80upx; font-size: 32upx; }</style>注意一下rpx这个单位,一般我们在做HTML、CSS时,都是用px,1px就代表1个显示器上的物理像素,在uniapp中也是这样1px等于一个物理像素,但是手机的分辨率是很多样的,因此我们不能方便地控制大小,所以才有了rpx这个单位,这个单位会把屏幕总宽度当成750,当屏幕宽度不足750的时候,1rpx会小于1像素,屏幕宽度大于750的时候,1rpx会大于1个像素。1rpx=屏幕宽度物理像素数量/750。
关键的地方我在上面用注释写了一下,要是都解释一下的话,估计得好几万字,有不清楚的留言吧。
下面是设置页面的代码:
<template> <view> <view class="set_header"> <view class="shd_topBar"> <view class="avatar"><image src="../../static/avatar.png"></image></view> <view class="title"> <view class="nickName">老赵和登录界面模板他的</view> <view><uni-tag text="管理员" type="error" :circle="true" size=" *** all"></uni-tag></view> </view> <view class="setBtn"><uni-icons type="gear-filled" color="#fff" size="26"></uni-icons></view> </view> <view class="iCounter"> <view class="item"> <view>999</view> <view>发布</view> </view> <view class="item"> <view>888</view> <view>解决</view> </view> <view class="item"> <view>999天</view> <view>任职</view> </view> </view> </view> <uni-list> <uni-list-item class="listItem" title="这里能有些什么功能呢?" :show-badge="true" badge-text="12"></uni-list-item> <uni-list-item class="listItem" title="我们以后用的时候再设计" :show-switch="true"></uni-list-item> </uni-list> </view></template><script> export default { data() { return { } }, onShow() { console.log(this.getLoginMsg()); }, methods: { } }</script><style> .listItem{ background-color: #fafafa; } .set_header { padding:50rpx; margin: 30rpx; border-radius: 20rpx; background-image: linear-gradient(to right bottom, #0ba360 0%, #3cba92 100%); /*上面这一行是给头部加渐变色的CSS,有一个网站专门提供这个代码,挺有意思的*/ height: 200rpx; } .shd_topBar{ display: flex; } .shd_topBar .avatar{ width:100rpx; height:100rpx; overflow: hidden; } .shd_topBar .avatar image{ width:100rpx; height:100rpx; } .shd_topBar .title{ flex:1; padding:5rpx 0 0 30rpx; } .shd_topBar .title .nickName{ color:#fff; font-weight: bold; text-shadow: 1rpx 1rpx 1rpx #999; } .shd_topBar .setBtn{ width:60rpx; height:100rpx; overflow: hidden; line-height: 100rpx; } .iCounter{ display: flex; margin-top:50rpx; } .iCounter .item{ flex:1; text-align: center; color:#fff; font-size:8rpx; }</style>**这个页面使用了uni-tag组件,别忘了安装一下。
一个APP通常由很多个页面组件,那么他们之间肯定要调用很多相同的 *** ,我们不能每个页都重写一遍所有 *** ,所以我们要找一个定义一次就可以在整个APP、内调用的办法,那就是在main.js里定义。我写了一个检查登录状态的函数,那么现在我的main.js代码就是这样的了:
import Vue from 'vue'import App from './App'Vue.config.productionTip = false/** * 检查是否登录的全局 *** * ========================= * 如果登录了,返回一个对象,里面有pid * 这个函数不验证具体的身份是否正常。 * 它只是记录了登录信息,具体在调用API时在服务端会对这些信息进行验证。 * 所以这里不用操心是否正确。 */Vue.prototype.getLoginMsg = function(){ var loginMsg = {}; //定义一个空对象 loginMsg.pid = uni.getStorageSync("login_pid"); //用同步的 *** 在磁盘中读取保存的pid if(loginMsg.pid.length < 1){ //login_pid是空的,就是没登录,直接返回false,连调用API的机会都没有。 return false; } loginMsg.userPhone = uni.getStorageSync("login_userPhone"); //登录手机 loginMsg.vCode = uni.getStorageSync("login_vCode"); //md5后的验证码 loginMsg.startDate = uni.getStorageSync("login_startDate"); //登录的日期 loginMsg.Identity = uni.getStorageSync("login_Identity"); //用户身份(管理员、员工、业主) console.log(loginMsg); //调用试用的,这句代码是在控制台输出东西。 return loginMsg;}App.mpType = 'app'const app = new Vue({ ...App})app.$mount()大概就是这样,先做个样子,还没做逻辑功能。以后用到什么功能再加。